Thursday, September 15, 2011

Wow! Lots of time means lots of changes!

So it's been a very long time since I've updated on here!  Summer was way too hot to be baking so I didn't do too much.  I did make my ex-coworker a fun garden cake since she absolutely loves gardening when she's not baking.  I got the idea from Martha Stewart.
Garden Cake

It was such a cute white picket fence with chocolate wafer crumbs for dirt, green sprinkles for grass, fondant for flowers and vegetables (carrots, eggplant, tomatoes, pumpkins, and zuchini).  All of these vegetables are currently in her garden-well hopefully they survived the hurricane!

view from the top of the cake

closeups of the veggies on the garden cake

So this cake was made in June and since then I haven't done too much baking.  With no air conditioning in the kitchen, there is no way to work with fondant without it getting wrecked or having to do it over several times.  I was also busy trying to find a new job and figure out my timing for moving back to my hometown in Milwaukee, Wisconsin.  I have also been planning my wedding since my boyfriend proposed after our vacation in July.  I have made the tough decision to move back before him since he is stuck in his job until February.  I moved back last week and we have planned to visit each other at least once a month.  Luckily, he will be here tomorrow! Yay!  So that's my story for now.  If anyone knows anyone I can connect with in Milwaukee, I would appreciate it because I love talking and learning about baking!
Until next time, happy baking!

Kay

Friday, May 27, 2011

Busy Busy Week!

Wow! It has been a crazy busy 2 weeks!  Last week my mom came out for Chris' graduation.  She was here Tuesday night through Sunday morning.  It was really fun even though I had to work for most of  the time.  The graduation was awesome and even better...the food!  My mom helped me out and we made pulled pork sandwiches, fruit skewers, potato salad, tuna macaroni salad, veggie pizza, and his favorite snicker brownie cupcakes.  


It was really fun.  I used Reese's cups then put a square of Hershey's chocolate on top.  I piped the tassels with half orange and half blue for Purchase's colors.  Everyone loved them and they were really cute!

Next up was this week.  A friend of mine introduced me to a friend of hers looking for a cake and cupcakes for her son's 1st birthday party.  He is very into Yo Gabba Gabba.  A number of my friends don't have kids yet so they're reactions were the best..."Yo Gabby what?"  Haha!  I didn't know too much about the show but I had seen pictures.  She sent me a picture of a cake she liked and then said she wanted the faces of the characters on the cupcakes.  I was excited because they're such fun colors and cool looking characters.  They were just picked up tonight and they were so excited.  It sounds like the party is going to be a blast- the characters face painting for the kids, bubble machine, character shirts for the kids, lots of fun Yo Gabba Gabba games and decorations.  I wish I was a kid!

Red Velvet Cake with Cream Cheese Frosting


Chocolate cupcakes
Vanilla cupcakes

Now, it's time to go relax.  Until next time, happy baking!
Kaitlin


Thursday, May 5, 2011

A spot of Tea and Crumpets


Alright, alright.  I know I am dreadfully behind and now I have two posts in one day.  I really need to work on this.  I guess I should start putting this blog ahead of my relaxation time.  Yea, that's not going to happen.  Well, in honor of His and Her Royal Highnesses (is that right?), I made crumpets last week and brought them into work on Friday morning.  I should have just stayed up and watched the wedding live after I finished the crumpets but I did have to work so I filled up my DVR with all of the wedding craziness.  I absolutely love that they televised it.  I kind of understand how some people don't get all the hype because I don't know if I really get it either but I just absolutely love watching weddings.  Kate's dress was absolutely gorgeous and Will looked handsome.  I would have very mixed feelings about going through something like that.  On one hand, I would be completely nervous that I would mess up with all those people watching and I would try to just speed down the aisle because I wouldn't want all those people staring at me.  But then again, I have also always wondered what it would be like to be famous and have that many people be interested in my wedding.  Imagine, the Queen fighting for a ticket to my wedding.  Hah!  As my mom says, I still have a chance with Harry.  Apparently his girlfriend doesn't like the idea of all that attention.  I'm guessing that will change once a ring is in the picture but who knows, she seems nice enough and able to fit in there.

Back to baking...I thought it would be so much more difficult to make crumpets than it was.  It was a mix between making bread and pancakes.  I was a little worried since I decided to make the crumpets Thursday afternoon and saw on different websites that I needed "crumpet rings".  Luckily enough, a couple weeks ago I bought a set of maybe 10 multi-sized round cookie cutters.  These worked perfectly as you can see in the picture below.

All I had to do was mix some yeast with water and milk and butter, then beat it with some flour, let it sit and rise, then beat it again.  After that, I just filled the cookie cutters with batter.  When the bubbles popped, I removed the cutters and flipped the crumpets.  I think they looked great.  You can judge for yourself.  I then added raspberry preserves on top and they tasted amazing.  Another item I had never had before and another item I will be making again in the future.

Until next time, happy baking!
Kay

Recipe from GroupRecipes.com

Ingredients

How to make it

  • Grease inside of 6 crumpets rings.
  • In a bowl or jug, with a spout, mix together water, milk & sugar.
  • Heat in microwave to scald milk & then cool to lukewarm
  • Sprinkle the yeast over the lukewarm liquid & let sit for about 5 mins until yeast has softened. Stir
  • Add to yeast mixture the beaten egg, salt & melted butter. Mix well
  • Add flour & beat until no lumps remain
  • Cover container with plastic wrap & leave in a warm place & let rise until batter has doubled, 35 - 40 mins
  • Beat down lightly & let batter rest for about 5 mins
  • Heat electric griddle to about 365 degrees & brush with melted shortening
  • Place rings on griddle & heat well
  • Fill the rings at least 1/2 full with batter, dividing the batter between the 6 rings
  • Cook until bubbles form on the tops & start to pop & the bottoms are golden
  • The crumpets will pull away from the sides of the rings slighty
  • Using tongs, lift the rings off the crumpets & flip them over
  • Cook for about 2 mins until lighly golden
  • .
  • NOTE:- I like to use a container with a spout to ease pouring
  • You can cook the crumpets on an electric griddle or in a heavy skillet on top of the stove. Just make sure your skillet is completely flat or the batter will run out under the edge of the ring.
  • If you don't have crumpet rings, save tuna cans, shrimp cans etc & cut off the tops & bottoms. They make perfect rings

Spring in New York

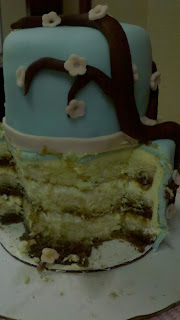
Creme Brulee Cake decorated as cherry blossom branch  cake
Yes, yes. I know.  This post has been a long time coming and I'm sure most of you have already seen the pictures of it on Facebook or Twitter.  I was reading a book called, Always the Baker, Never the Bride.  It's a great book that is a story about a woman who is the head baker at a small bakery and gets recruited by a newly renovated one stop wedding facility.  The author includes a few great recipes, but the masterpiece of the book was this Creme Brulee cake.  The author didn't include the recipe unfortunately, so I had to use some other recipes with a few variations.  The basics are the cake is a sour cream cake, I used creamy vanilla icing in between the layers and covered it in buttercream.  I was also tempted to add some caramel frosting between the layers as well.  I also put Simple Syrup made with dark brown sugar in the base of the cake pan then poured the cake batter over and baked.  In the end, this cake came out fabulous!  I will make it over and over again!  Surprisingly, I've never had Creme Brulee before but others who tried definitely got a taste of creme brulee event though it wasn't the same texture.  I think it was a major success considering one of my co-workers, who never eats my desserts that I bring in because she only eats non-fat/sugar free food, actually tried it.  That may have been because I left out the fact that it was covered in buttercream!  Haha! Oh well!


These are a few more pictures detailing the outside of the cake with the branch and flowers.  It was so simple to decorate for this look.  I've seen the trend popping up lately and I figured what better time to make a cherry blossom branch cake than Spring in New York.  The trees are in full bloom here and I just love the aroma.  However, nothing beats walking past the large planters on the sidewalk in the city that are filled with lilacs.  They just have such a great and powerful scent that you can practically smell them from a block away.


This is the inside of the cake.  Doesn't it just look amazing.  I love how the simple syrup gave a difference in color and it just stands out so much.  I can't wait to make it again.  It has probably in my top two of cakes right now.  It's difficult to decide between the funfetti cake and this.  That rainbow chip frosting that goes with funfetti cake is just hard to top!

Until next time, happy baking!
Kay

Wednesday, April 6, 2011

Creativity Machine

So I've been asked to make two cakes now for work friends' friends and both cakes would look much better with some airbrush effects.  I'm looking into getting one and from my research, I've found that dual action is definitely the way to go.  I've also found the Master Airbrush is a top set that I would probably like.  I'm wondering if anyone else has opinions on airbrush kits that would help me out.

I can't wait to get one to play around with and really see what happens with it.  It can create some awesome effects on cakes as shown below.


Let me know if you have any information.  Thanks!

Until next time, happy baking!

Kaitlin

Thursday, March 31, 2011

Fish Bowl of Sweets

I know, I know!  Two posts in one day=crazy! I had to post this though because I finally put together my masterpiece for the Jelly Belly Challenge.  

One of my mom's co-workers showed the website to her and she then told me about it.  Basically create art with Jelly Bellies on cupcakes and get people to vote for you.  The most votes wins $10,000.  So if any of you really want me to start a bakery, please vote for me as much as possible and get EVERY single person you know to vote for it and I can provide you with a professional bakery full of sweets for everyone.  You have to register for free to vote and then I think you can vote once a day.  Keep voting!!  Yes, I have entered the link to my specific creation numerous times here so you don't mistake it and vote for someone else's.


I'd like to thank Dylan's for having a wall full of different Jelly Bellies for me to take as many as I wanted and plenty more too!  Let me know if you have any questions or suggestions for other cupcakes.

Until next time, Happy Baking!

Happy Birthday Erin!

Luckily enough I met Erin on a recruiting trip for the swim team for our college.  We decided it'd be a great idea to choose to be roommates so that we didn't have to be stuck with some crazy stranger.  We then went on to be roommates for 4 years.  Over the weekend she turned 26 and her awesome boyfriend decided to throw a surprise party (that didn't end up a surprise since he couldn't keep a secret! Haha!).  I offered to make the cake to celebrate and asked him and one of her sisters about her latest likes and hobbies.  The main one they gave was facebook games.  That was an interesting idea but I wanted other ideas.  Craig mentioned skulls and Lauren mentioned books. The books was a great idea but seemed too simple so I decided to go with the skull option.

Erin's most favorite cake is funfetti with rainbow chip frosting.  It's my favorite too!  I used to make it in college randomly because I was craving it.  The cake wouldn't last long.  So I covered the cake with black fondant, wrapped red ribbon on the bottom of each tier, the iced skulls with glittery white icing gel.  I made the large skull out of fondant and the bones and 26 are made out of chocolate.  I got the idea from Dudeman's blog and adapted it a bit. It tasted awesome and everyone was surprised by the cake.  Craig kept trying to take credit for it at the restaurant but not many people believed him.  Haha!  I think I will make cake pops out of the left over cake parts.  I will also be attempting the Jelly Belly Contest.  I will post pictures as soon as possible!

Until next time, happy baking!!

Kaitlin

Wednesday, March 16, 2011

Kiss Me I'm Irish!

So I love St. Patrick's Day- not just because of the green beer but because I'm Irish and it means another holiday that I can bake for!  I do like the beer though, don't get me wrong.  I am from Wisconsin with some of the best beer.  Since I am currently in New York, I guess I will focus on the baking.  My sister is a first grade teacher in Wisconsin and I always try to find something fun to send her class each year.  I realized a couple weeks ago that I hadn't sent anything yet but was happy to think that St. Patrick's Day was coming up soon.  Sure, I could've just done Easter but was excited about having a fun activity to send with the treats.  I got a great idea from SomethingShinyBlog on her St. Patrick's Extravaganza post.  I decided to make green velvet cake pops and sugar cookie shamrocks.
Green velvet cake pops
These were such a cute idea and they turned out great!  I just made green velvet cake with cream cheese frosting then dipped it in white and green chocolate candy melt chips.  I had picked up awesome sprinkles that have white regular sprinkles and green shamrock sprinkles.  They are sooo cute.  I mixed and matched and put some on each of the white and green chocolate.

They turned out pretty cute, huh? 

Inside of the green velvet cake pops

They turned out so green on the inside.  I was so excited.  I think the first graders will love that the inside is green.  I know when I was a kid, I loved coloring all of my food (heck, I still do!).  That's another great thing about St. Patrick's Day.  My mom's friend has always dyed her entire gallon of milk green each year and I think that is just too fun!
Sugar Cookie Cutout Shamrocks with Royal Icing 

My next item was cookies.  Kids always love cookies.  I had never flooded with royal icing before.  I definitely need some practice and I definitely over whipped the royal icing.  I know a lot of taste testers who will not mind me practicing more.  So I baked the cookies, waited for them to cool, and outlined the cookies in typical Irish colors: dark green, orange, white, and I threw in light green too.


After the outlines dried, I tried to flood the cookies.  I don't think I put enough icing on each for them to actually be flooded but they turned out cute enough.  I will definitely need to make the icing more liquidy next time.  Once the flooded part was dry I was able to make all the fun designs.  Those really made the cookies!  

Taste testing was next and man were both the cookies and cake pops tasty.  I could've eaten all of them. Fortunately, since I'm not swimming anymore I had to send the majority of them to my sister's class and extras for her friends.  She said if there were extra after that, she might give one each to my mom and dad.  I'm glad I finally get to post these pictures because the package arrived today just in time for tomorrow.  To send them out, I package each one individually.  The cookies got shamrock plastic bags and the cake pops got clear bags with either a green or white ribbon (green went with the white pops, white went with the green pops).  I forgot to take pictures of the completely finished product.  I hope you enjoy these and they inspire you to make your own.  I know my mom tried them out over the weekend and they looked great.

Look forward to next week-  a fun surprise in the works!

Till next time, happy baking!
Kaitlin


Friday, February 18, 2011

Happy Birthday Chris!

Joyeux Anniversaire!!

I've always loved the phrase Joyeux Anniversaire.  It sounds so pretty.  Well yesterday was Chris' 34th birthday.  I was really excited because my family has always done birthday dinners.  Birthdays have always been special and my sister even gets birthday week from her husband.  We get to choose our most favorite dinner and dessert ever and my mom would always make it.  I still remember the time when I was younger that I requested sloppy joe's specifically because my sister didn't like them and because she had requested tacos which I didn't like.  My brother-in-law asked for homemade chicken pot pie, which my mom had never made and it made her laugh but she still made it.  


Well, last night was supposed to be Chris' big birthday dinner but he had to go to class instead so it will have to be tonight.  He decided he would like sausage and peppers for dinner and my brownie surprise cupcakes.  These have always been his favorite.  They are regular brownies with Snickers in the middle.  I top them with buttercream frosting (this time tinted blue since that's his fave color).  I got this amazing recipe from Better Homes & Garden.  I hope you take the time to try them out.


Next up, St. Patrick's Day!  Any ideas anyone?  Let me know and until next time, keep baking!

New Take on Valentine's Day Bears

Happy belated Valentine's Day!  I got a great idea for my Valentine's Day treats this year from Bakerella.  She is best known for her cake pops and created the amazing book, Cake Pops.  I still have yet to buy it but it's on my list.  

They are actually very easy to make.  You bake any kind of cake in a 13x9 pan.  Once it has cooled down, cut it into 4 sections.  Take one section out, break it in half and rub together so that it crumbles up.  Repeat this until all of the cake is crumbled up.  Add 2 cups (1 tub) of frosting and mix together.


Shape into 1 1/2" balls and stick in the freezer for a little while to firm up.  Then shape into a peanut shape.  Take a large candy heart and press it into the cake to flatten out one side of the peanut shape.  See below for a picture of the cake.

Take the candy pop stick and dip it in the melted candy coating and stick about halfway into the cake.  Stick chocolate chips in for ears and a nose.  Then put in the refrigerator to firm up.  Melt the chocolate candy coating and dip the cake pops in straight down and straight back up.  Let the chocolate drip off the cake pop and put back in the refrigerator.  Once it has hardened, place the large candy heart on the stomach, two Hershey Kisses as legs, M&M's as arms, and use a black edible ink marker to draw the face, and wafer sprinkles for the pads on the feet.  They are as cute as can be!  Serve and enjoy!  No need to store them in the refrigerator.


Happy Valentine's Day!  Please let me know if you have any questions.  Until next time, keep baking!


Wednesday, February 9, 2011

Thanksgiving, Christmas, Baby Shoe Cake Topper

As you can probably guess, I am really bad about updating this blog with all of my pictures.  I don't know why I never thought to download the Blogger App for my DroidX, but I will now try that out and maybe I can get these pictures up faster.  I feel like I am rarely on my computer now that I have the Droid.  I don't have to wait for the laptop to turn on and load everything so I just go straight to my phone instead.  I hope you enjoy the latest treats.
These are the Thanksgiving cupcakes I made with my mom and sister.  They are chocolate cupcakes with a caramel frosting.  We used softened caramels for the turkeys, mini M&Ms, rolled out sugared Dots, and candy coated sunflower seeds.  Didn't my sister do a great job rolling out the Dots?  She is very proud of the part she did in these cupcakes.  We got the idea from Better Homes & Garden.


For Christmas Eve, we went to Chris' parents house and celebrated.  I was a lot of fun.  For Christmas Day, we went to my Aunt and Uncle's house in Connecticut.  I decided for the dessert, I would bring these Christmas Tree cupcakes.  I was so excited when I went to Michael's and saw the jingle bell light and star sprinkles.  They were just too perfect.  I made chocolate cupcakes with buttercream frosting.  I used mini cupcakes for the base of the trees and used cone cups to make the cone shape of the top of the tree.  I then used a star tip to put the frosting on.


 This is what the cupcake looked like under the frosting.  Most people thought they were all frosting, but not many people can handle that (I would've LOVED it.  Frosting is my fave part.).

For New Years, we went to our friends apartment.  My mom gave me the idea for this because her and my sister went to Cheesecake Factory a couple weeks earlier and saw they had a red velvet cheesecake.  My mission was to try to replicate it.  I have to work on my red dye because it didn't come out quite red enough.  I started with 1 9inch red velvet cake round and 1 9 inch cheesecake round(no graham cracker crumb crust). I split the cheese cake batter in two and made two separate ones and sliced the red velvet cake in half.  I layered buttercream frosting in between each layer.  It is a very rich cake!

One of my co-workers is pregnant and she asked me if I would make her edible baby shoes.  I had never done these before but figured they couldn't be too hard.  I started out with a practice pair and used fondant for the laces.  They dried really quickly and kept breaking so my final pair(shown) have string laces.  I can't wait to see pictures of the precious boy.  Everyone is thinking he will be born on Valentine's Day since her due date is the 12th.


Please let me know if you have any questions or suggestions of things I should try.

Until next time....Enjoy and keep baking!
--Kaitlin